If you’re looking for a project that you can start and finish within an afternoon, this simple design by Ruth Oliver will soon become a favourite. These cute little plimsolls will make the ideal footwear for babies who are starting to find their feet. Please follow our video tutorial and if you have any questions pop into our shop 80 Warwick Road, Kenilworth, CV8 1HL or give us a call at 01926 859892. All of the supplies used in this tutorial were bought at Karen Delahunty’s Sewing and Knitting Centre.
Thank you to Sew Magazine for providing us with this lovely pattern you can find this pattern and many other amazing designs here.
Before you start make sure you have all your pieces cut out. I have already ironed the interfacing onto the heel and toe piece prior to the video.
What you will need
- Template file
- Printed pattern fabric
- Medium weight denim
- Felt
- Lightweight fusible interfacing
- Wadding
- Elastic, 6mm wide
- Embroidery thread
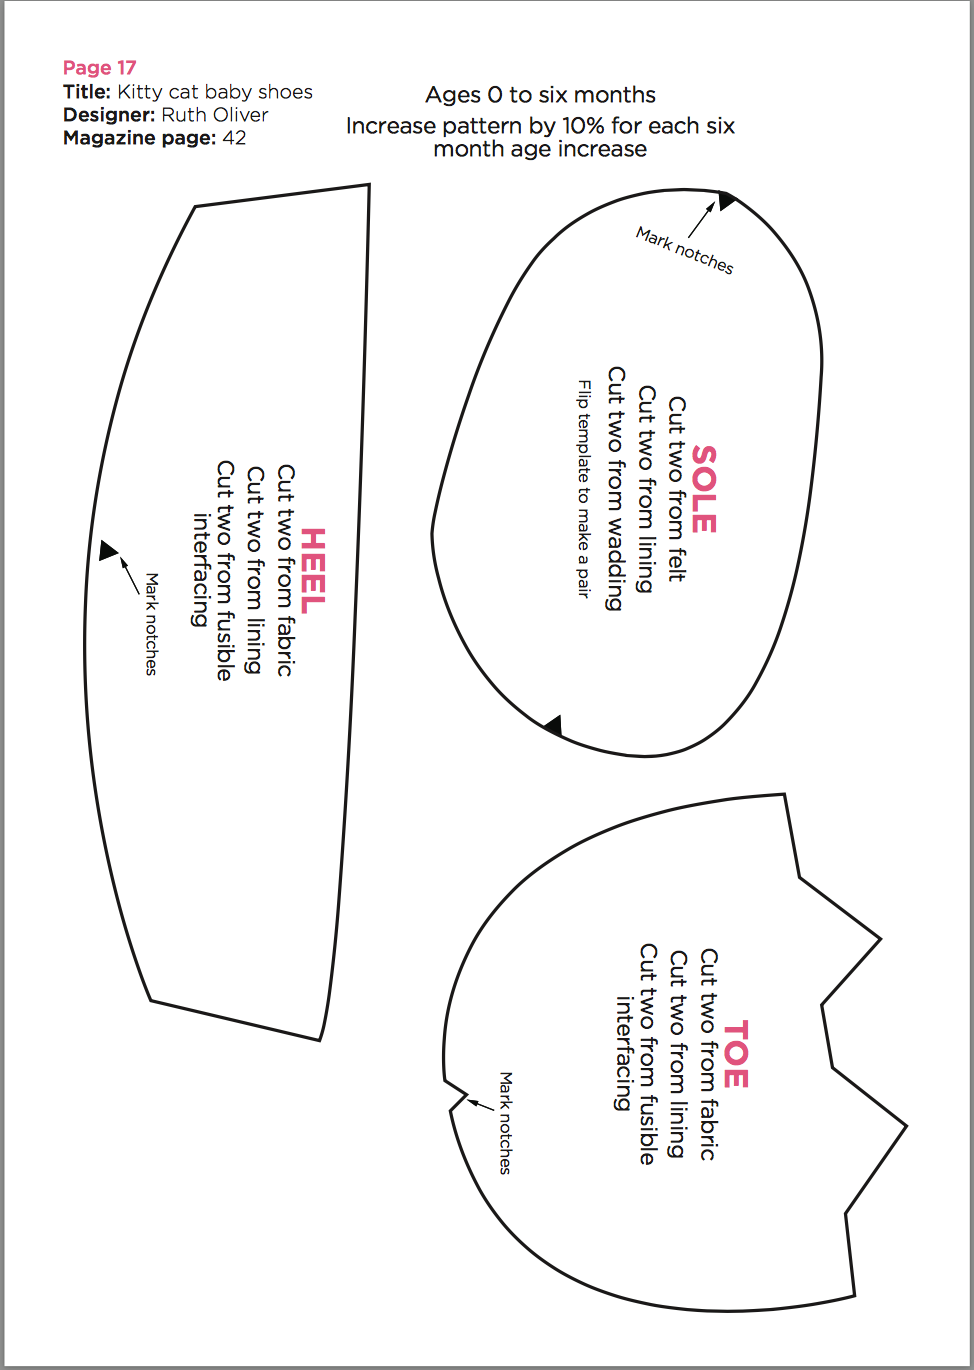
This pattern is for a size 0-6 months. But you can increase them by 10% to go up another 6 months.
Sew kitty plimsolls
Download the templates above and use them to cut the foot, sole and heel pieces, make sure that for the second shoe you reverse the sole to create both a left and right foot. Adhere the interfacing to the wrong side of fabric outer heel pieces and outer toe pieces.
Pin the lining and outer fabric pieces of one heel, right sides together, and sew along the straight edge with a 5mm seam. Flatten out and press the shorter outer edges in by 5mm, then topstitch to create a hem. Fold the top seam, with wrong sides together, and press. Topstitch 1cm down from the top edge to make a channel and thread a 14cm piece of elastic through it. Stitch securely at each end, then repeat for the other heel.
Pin the outer and lining fabric pieces of one toe, right sides together, and taking particular care around the ears, sew the top edge with a 5mm seam. Clip the corners and turn right side out, press, then topstitch around the ears. Repeat for the other toe. Using coordinating thread, embroider two eyes, a nose and whiskers on each piece, using satin and straight stitches.
Place the felt outer and lining fabric pieces of one sole, wrong sides together, with wadding sandwiched in between. Stitch closely around the edge to secure, and repeat for the other sole.
Pin one toe section to one sole section, right sides together, matching up the notches. Pin a heel section to the sole, aligning the notches and overlapping the toe by 2cm. Sew all around with a 7mm seam, back tacking to secure. Trim the seam with pinking shears and turn right side out. Hand sew the elastic ends of the heel to the inside of the toe piece to secure the opening. Repeat to create the other shoe.
For the bow, cut 5cm x 10cm of fabric on the bias. Fold the long edges to the middle and the two shorter ends to the centre. Pinch to create the shape and hand stitch in place. Sew a small piece of fabric around the centre and attach, as shown on the video.
Again thank you to Sew magazine and the designer of these shoes Ruth Oliver for providing us with these gorgeous shoes. We hope to see your responses.