Posted on

Crafty Friday: Buttons The Sew Saturday Cat

We’re Sew excited for Sew Saturday, happening on 15th October, that we wanted to share with you a tutorial for how to make your own felt kitty pincushion, Buttons, the Sew Saturday mascot!

Buttons, the Sew Saturday Mascot

If you’re not sure about what Sew Saturday is, or want to know more about what we’re doing, check out our latest vlog on YouTube!

What You’ll Need…

  • One Felt Square (Two, if you would like the ears and tail to be contrasting to the main body.)
  • Printed Fabric 5cm x 6cm
  • 20cm of Ric-Rac
  • Toy Stuffing
  • Coordinating Sewing Thread
  • Air-Erasable or Washable Marker Pen (We used a Sewline Fabric Marker)


How to Make Your Kitten Pincushion

Print the Cat Pin Cushion Cutout pattern using the link below and cut out.

Place the pattern on your square of felt and cut out. If you have chosen to contract the ears and tail, you’ll need to cut them out in the contrast felt.

Make sure you cut 2 of the main body, 2 of the ears and one of the tail.

Stitch the two body pieces together, either by hand or sewing machine, using a 1.5 cm seam allowance. Trim this seam allowance back to 3mm.

Cut a slit in the front body of the cat – as seen on the pattern piece. Turn your cat inside out and stuff firmly with toy stuffing. We used a polyester toy stuffing.

Once stuffed sew up the slit in the front of the cat. Using the tummy piece from the pattern, cut out in fabric. We used a lovely polka dot jersey material for our cats tummy. Once cut out, tack in place, making sure to cover the stitched gap, where you stuffed the cat.

Sew your ric rac over the edge of the tummy, using a matching thread so the stitches can’t be seen. You can hide the join at the top of the ric rac with embellishments like bows or bells, or you could leave as it is as we have done.

Embroider a cute nose, and mouth by hand and sew two buttons in place to create the eyes, we used general fish-eye buttons as we thought they looked very cat-like.

Hand sew on the ears and tail, using small stitches and angling your needle, so to hide the sewing in the seam of the body. Add some decorative pins in place as whiskers.

And there you go, your very our Sew Saturday mascot cat, buttons!

Thank you to Sew Magazine for the pattern to make buttons the cat.

Remember, if you spend over £30 on Sew Saturday at Karen Delahunty Sewing & Knitting Centre, you’ll get your very own, free pattern and complete kit for making Buttons the cat, along with lots of other exciting goodies!

Posted on

Crafty Friday: Knit a Katia Velour Snood

Hi Everyone!

This week’s Crafty Friday tutorial is one for all you knitters out there. Whether you’re a knitting newbie or a pro-knitter, this tutorial is really fun and easy to follow.

We love the Katia Velour yarn so much, that this year we’ve decided to restock it in the shop. We first introduced it last year and we had a wide range of plain colours which went down a storm, so this year we were really excited to hear that Katia had bought out a new range of Velour yarn, called Velour Prints. The colours are wonderful and because this yarn is so easy and simple to knit with, we think everyone should give it a go!

Katia Velour Prints and Katia Velour yarns are both available at Karen Delahunty Sewing & Knitting Centre for just £8.50 a ball. With only one ball you’ll be able to knit a really snuggly, soft snood. Each ball comes with a free pattern too. We think the Velour snoods – in plain or in prints – make the perfect handmade christmas or birthday presents. So why not give it a go?

What You’ll Need

  • 6.5mm Knitting Pins (30cm in Length)
  • 1 x Katia Velour (Prints or Plain)

How to Knit Your Katia Velour Snood

  • Start your knitting by making a slip stitch.
  • Cast on 41 stitches, remember that your slip stitch counts as one stitch.
  • *Knit one row to the end.
  • Purl the next row to the end.

Repeat pattern from * until you reach near the end of the yarn ball. Remember to leave some yarn for sewing up and casting off later.

  • Cast off your stitches, knotting the final stitch, to hold in place.
  • Using a Knitters needle or a Darning needle, sew up. Fold right sides in, from the cast-on edge to the cast-off edge, thread your needle with the remaining yarn and make a running stitch all the way along.
Posted on

Crafty Friday: Paper Dresses Tutorial

Our latest Window Display – which I’m sure you’ve all seen by now – sure has caught the eye of a number of people.

We’ve even had people just popping in to compliment us on it, which has been really rather lovely! One of the main attractions in our window has been the lovely handmade paper dresses garland.

We’ve had a few people call in and ask us how we made them, so this week, I thought it would be nice – and before our display changes again – to show you how to make your own paper dresses. Once you’ve made one, you’ll see that they really are so simple to do and you’ll be able to make as many as you like with ease.

​These would look really cute as a bedroom decoration for a child, or even as decoration in your craft/sewing room. I made all of mine different, but you could make you’re the same if you wanted; personally I quite liked the variety of different textures and styles.

What You’ll Need

  • 1 x Square of paper 30.5 cm x 30.5cm (12” x 12”)
    • I used Tanya Whelan’s Floral Pavilion Fabric Textured Papers, but you could use any. You could even use plain and paint/print your own design to them.
  • Scalloped Edge Scissors
    • You don’t have to use these, but I found they gave a really nice finish to my dresses.
  • Ruler
  • Pencil

How to Make a Paper Dress

Start by placing your square of paper, pattern side down. You should have the plain side facing up toward you.

​Fold the paper in half, vertically. Make sure you make the crease nice and strong, press it down a couple of times.

Open the crease you just made. Now, fold the square in to quarters, by folding the two outer sides in toward the middle fold.

Open out all creases and flip the paper over so you now have the pattern facing up toward you. Find the creases you just made and fold those in to the center fold. The two folds should meet in the middle.

Flip the folded piece over, so again the plain side is facing up toward you and the pattern is facing down.

​Using your ruler and pencil, mark a line 2 cm from the top. Drawn the line horizontally across the top.

Fold from the bottom, to the line you’ve just drawn. Press firmly to create a strong crease.

Keeping the smaller part at the bottom, fold it in and then back on itself, to make about a 1 cm fold. This will become the waistband of your finished dress.

Flip the paper over, so you have the patterned side facing up toward you again. You’re now going to make the collar.

Fold down the top two corners to create the collar.

The next step is making the pleat of the dress. To do this, pull the waistband on one side out to the side, hold it down with your finger, then make a line down the center and push out.

​Repeat this on the other side too.

Flip over again so the plain side is facing you again.

You’re going to make the V-neck at the top of the dress. This can be quite tricky, so do take care not to tear the paper.

Pull the top back with one finger gently, only to where the collar meets.Crease down the two sides, so you have an almost square shape at the top.

Next, you want to fold over the side piece all the way down.

Then you’re going to create the angle for dress, by folding down the side of the skirt too.

Repeat on the other side.

Flip the paper over again, now you have the pattern side facing up and you can see the dress is forming nicely.

​To make the little capped sleeve, you just fold the overhang at the top back on itself.

You can finish here, or you can trim the bottom of the skirt using the scalloped edge scissors, as I did.

We hope you enjoyed this little tutorial and (as always :-)) we’d love to see any that you have made too, so feel free to send those to us via social media or our email address karendelahunty@outlook.co.uk

Happy Crafting and Weekend-ing!

Posted on

Crafty Friday: How To Crochet a Granny Square

​For a little while now, I’ve been learning how to crochet and I have to admit, it’s been much easier than I first thought it would be. If you’re wondering about crocheting and want to give it a go, then this week’s Crafty Friday tutorial is a perfect starting point.

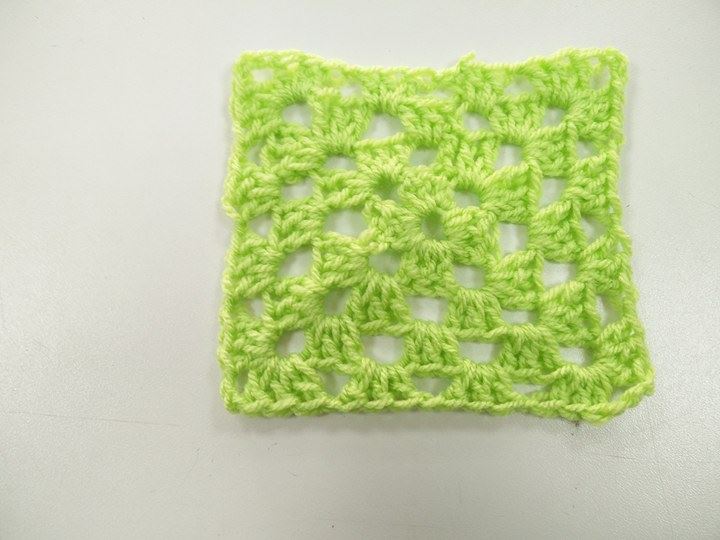
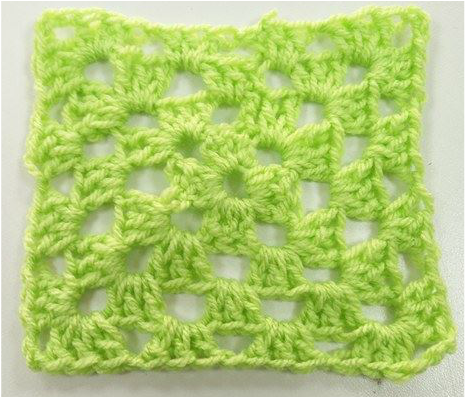
We are often asked in the shop about Granny Squares and how to make them, so this week, I wanted to share with you all a very simple way to make one. There are many different variations of Granny Squares, but the one I’m going to show you in this tutorial is very basic and I believe anyone can do it.

You can also check out our video tutorial for this below, or over on our Youtube Channel.

I’ve seen a number of people turn a variety of Granny Squares in to a blanket or even a decorative cushion and they look fabulous. This week though I’m just going to show you how to make the basic Granny Square.

What You’ll Need

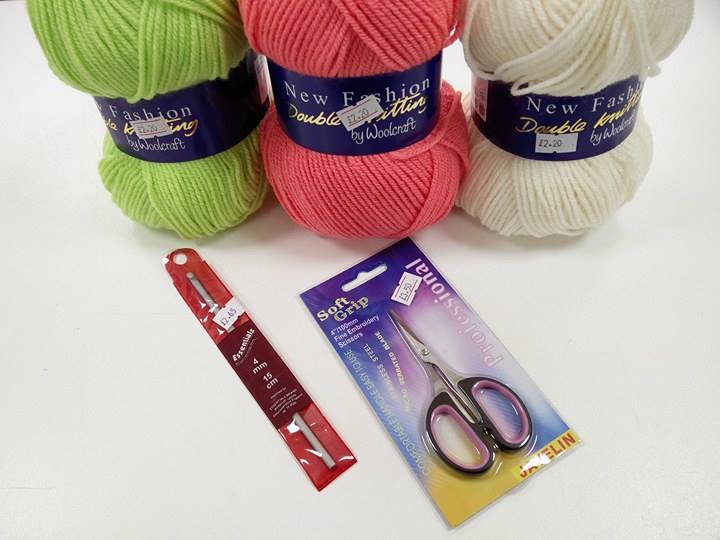
  • 4mm or 4.5mm Crochet Hook
  • Any Double Knitting Yarn
  • Scissors

How To Crochet a Granny Square

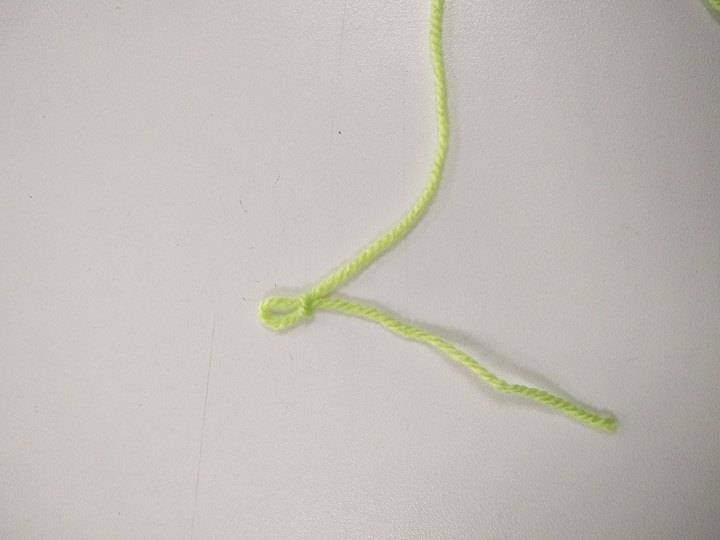
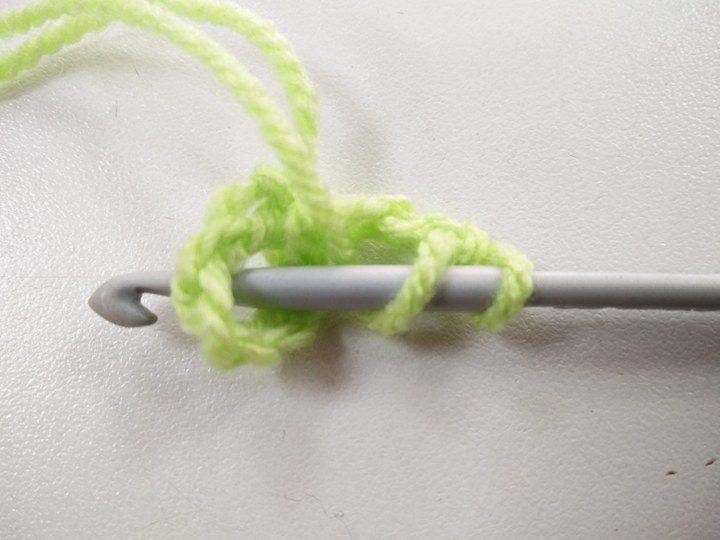
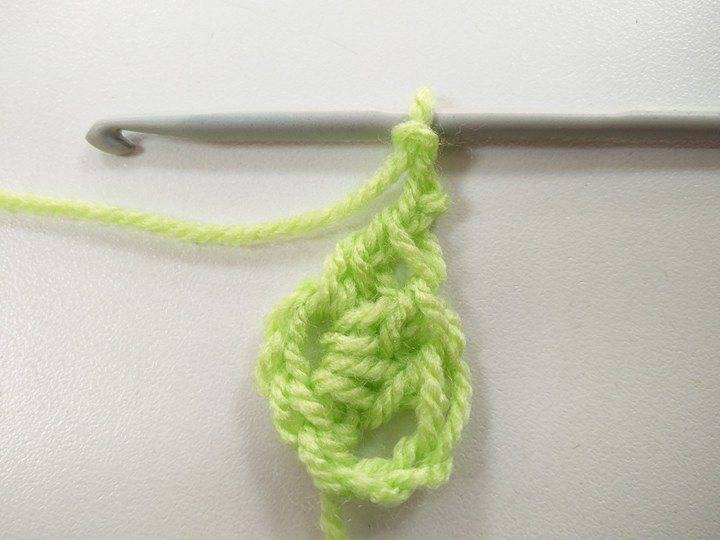
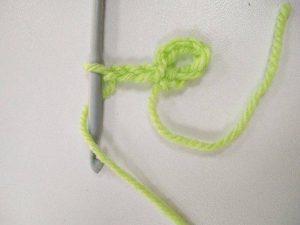
As with most Crochet Patterns, the Granny Square starts with a Slip Stitch (sst) and a Chain (ch) of stitches. To start the Granny Square make a Slip Stitch (sst) and Chain Stitch 6.

The next step is to make your chain in to a circle. You do this by inserting your hook through the very first chain that you made. You then want to wrap the Yarn Over (yo) and pull it through the first chain and the sixth chain.

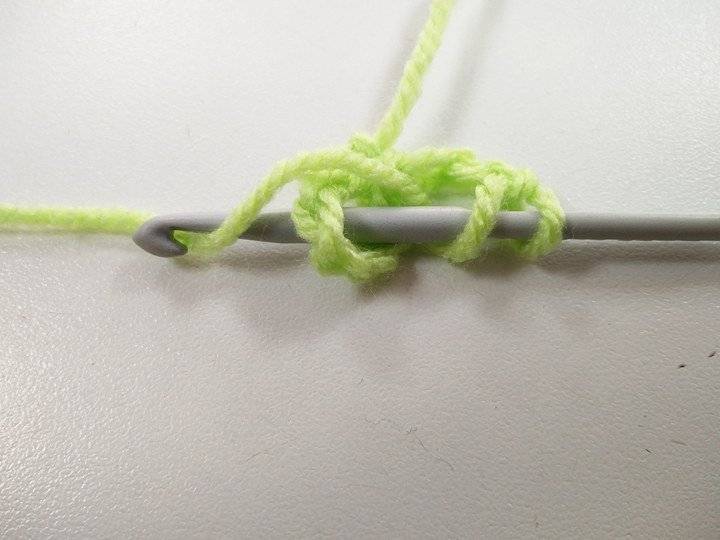
You then need to chain another three stitches; this will make the first section of the Treble Crochet Stitch (sounds scarier than it is, believe me J). You’re then going to work two treble crochets stitches.

To make the first treble crochet stitch, you’re going to wrap the yarn over your hook, then insert your hook in to the middle of the circle. You then want to yarn over the hook again and pull back through the middle circle. You’ll end up with three loops on the hook.

Wrap the yarn over the hook again and pull through two loops on the hook, yarn over a second time and pull it through the remaining two loops.

Repeat the previous step to create a second treble crochet stitch. You should now have three pieces coming from the circle that you started with. This is your first section completed.

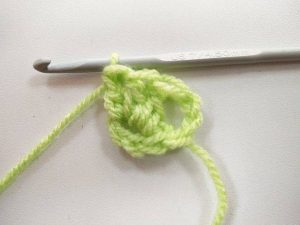
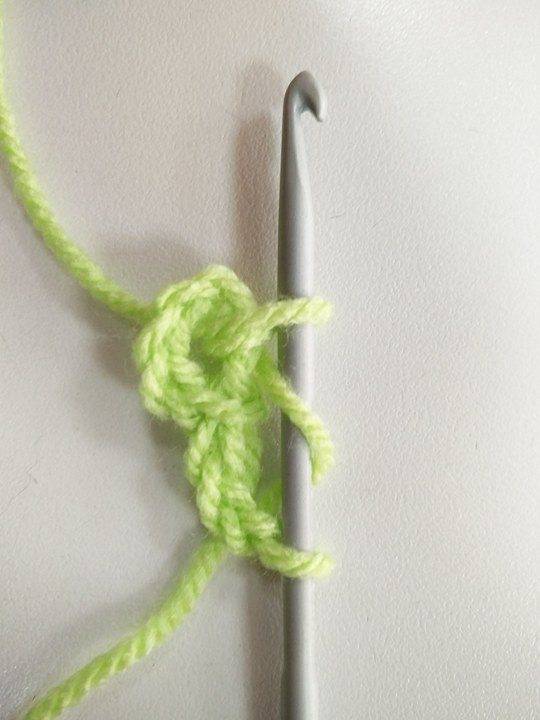
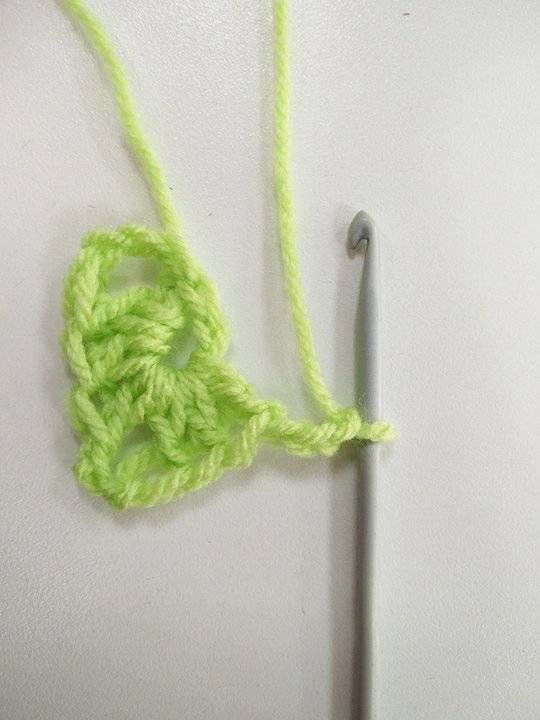
You then need to chain a further three stitches, this is to help create the corner of your Granny Square.

​You then want to create three more treble crochet stitches as per the previous steps. You should now have two completed sections with a gap between them.

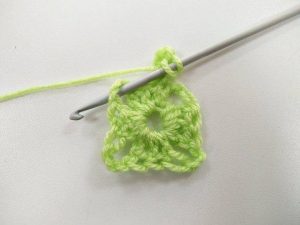
You want to continue in this way for the rest of the round. You’ll create four sections, each consisting of 3 trebles. Remember after the third treble you need to chain three before starting the next set of trebles.

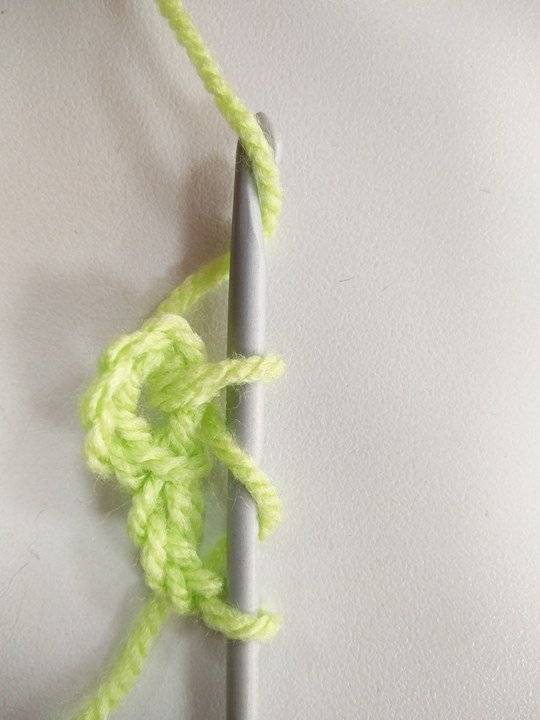
Once you have four sections, you’ll need to finish off the last corner. You’ll do this by making another three chain stitches, then inserting your hook through the third chain from the first section. Wrap your yarn over your hook and pull through both loops, this creates a slip stitch.

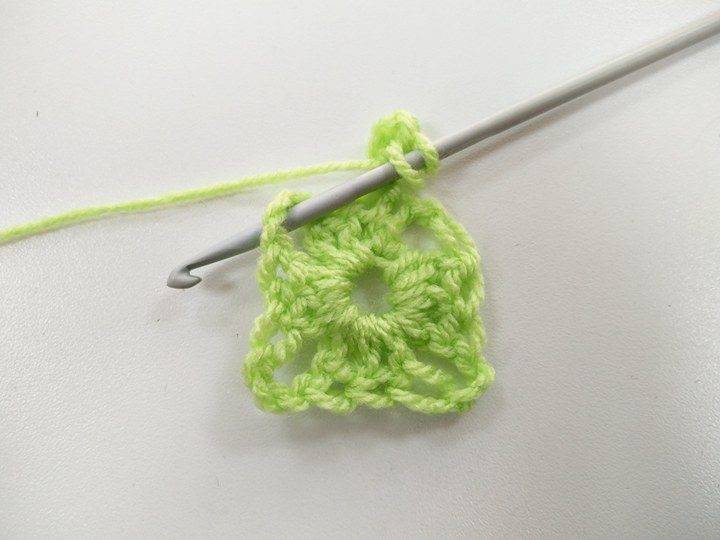
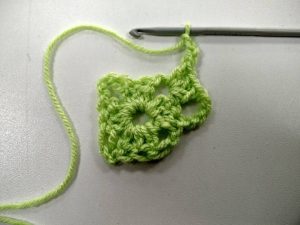
You’re then going to expand on that first round of crochet. You’ll start by making a chain of 4 stitches. You’ll then work three treble crochets in to the left-hand corner of the first round.

You’ll then need to create the corner again, so make a chain of 3 stitches. You’re then going to work another three crochets in to the same space as the previous step.

Once you have completed on corner of 6 treble crochets, you’ll want to chain one stitch and move to the next gap from round one.

​You’ll want to work three treble crochet in to that space.

Make a chain of three stitches and then work three more treble crochets in to the same space. So you’ll now have two corners each that have six trebles in them.

Make a chain of one stitch and then begin making three trebles in to the next gap from the first round.

Chain three for the corner and then create another three trebles in to the same space, now you have three sections in round two each with six trebles.

Make a chain of one stitch and then begin working three treble crochets in the last gap from round one.

Chain three to make the corner.

You don’t need to make three trebles in this final section as the initial chain of four you made at the beginning of the round will count as one of those trebles. So, you’re going to make two treble crochets.

Find the third chain from the first the chain of four you made initially and insert your hook in to it. Wrap the yarn over and pull through both loops on your hook, creating a slip stitch.

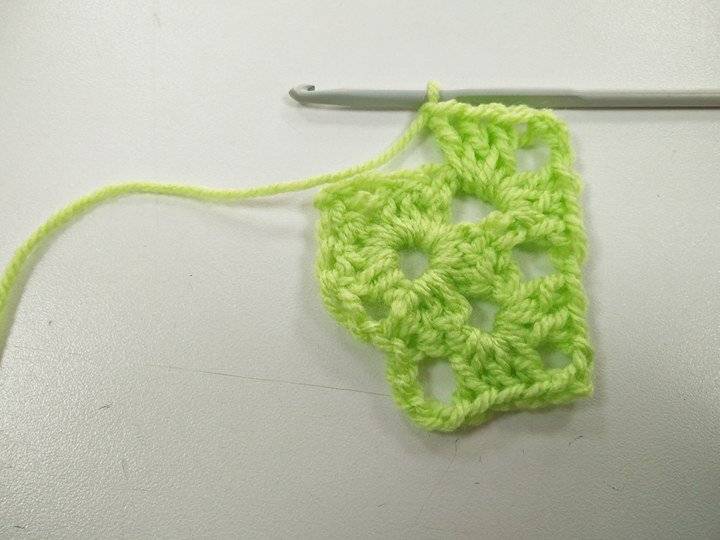
For round three, you need to begin with three chain stitches. These stitches count as one treble in the space below them. You’ll need to make another two trebles in the space below.

You’re then going to work in the same way as the other rounds:

  • Chain one stitch between spaces
  • Make three treble crochets in each gap
  • Chain three each time you reach a corner
  • Working a total of six treble crochets in each corner space
  • Join the ends by chaining one stitch and then creating a slip stitch between the last stitch on your hook and the third chain from your initial set.
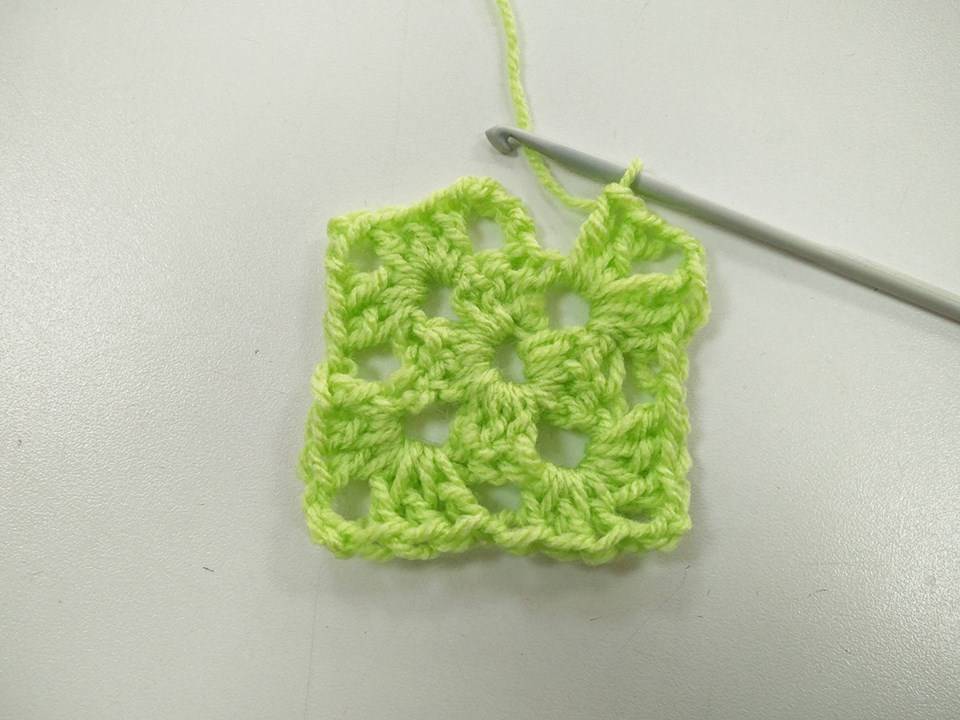
To begin round four, you’ll chain four and then you’ll work treble crochets in to the next available space. Again, you’ll continue the rest in the same way as the other rounds.

  • chain one stitch between spaces
  • Make three treble crochets in each gap
  • Chain three each time you reach a corner
  • Working a total of six treble crochets in each corner space
  • Join the ends by chaining one stitch and then creating a slip stitch between the last stitch on your hook and the third chain from your initial set.

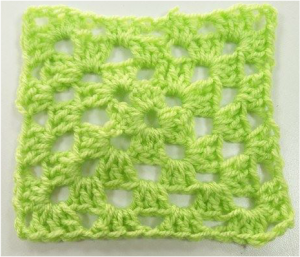
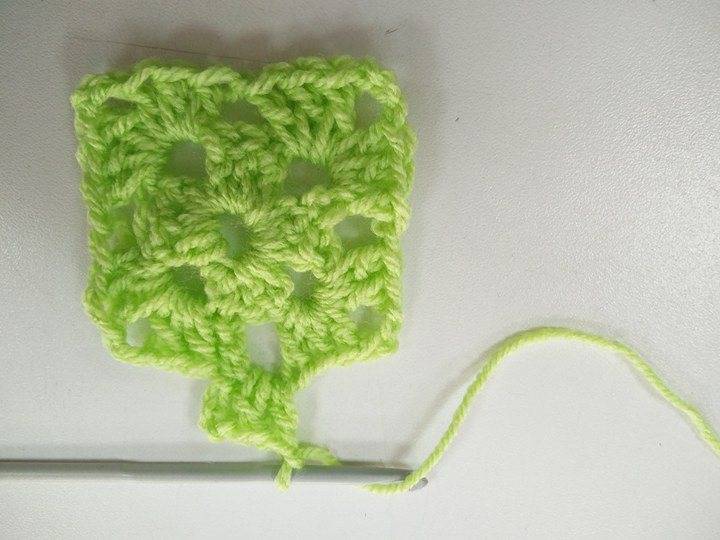
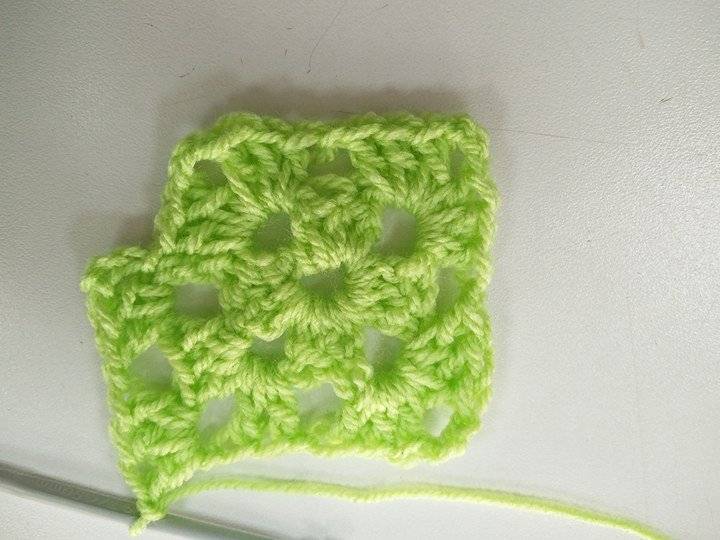
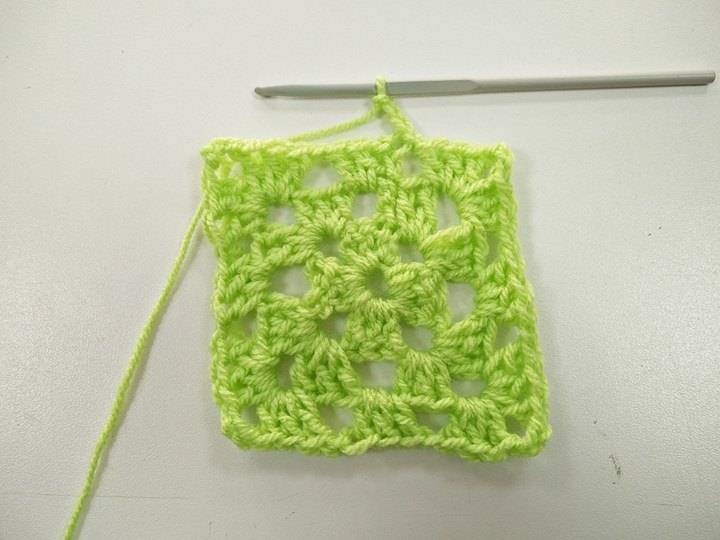
Finish by creating a slip stitch and pulling the yarn tight. This finishes your simple Granny Square.

​To make my Granny Square I used a Woolcraft New Fashion Double Knitting 100% Acrylic Yarn (£2.20 per ball – 100g) and an Essential brand 4mm Crochet Hook. Remember you can purchase any of the tools we used in our tutorials at Karen Delahunty Sewing & Knitting Centre.

​We hope you enjoyed this little tutorial and (as always :-)) we’d love to see any that you have made too, so feel free to send those to us via social media or our email address karendelahunty@outlook.co.uk

Happy Crafting and Weekend-ing!

Posted on

Crafty Friday: Heart Shaped Oven Mitt

We’ve stocked a gorgeous ‘country style’ printed linen fabric for a while now and for all the time it’s been here, I’ve been promising myself that I’d find a perfect excuse to use it. It’s far too pretty to be just sitting on a shelf, but what to make with it?!

Last week, I decided that for this week’s Crafty Friday tutorial, I would finally get around to using it – so I did – I made this lovely heart shaped oven mitt and I have to say, I’m really pleased with how it turned out.

You could make two, so you have a pair of mitts or just make the one (as I did). This tutorial will explain how to make just one mitt – if you’re making two, make sure to cut double to quantities shown below.

These would make lovely gifts for Christmas, House-warmings or even birthdays. The print on this material is super-cute and it adds a bit of that sought after country-style to any kitchen.

What You Will Need

  • 30 cm Fabric
  • 30 cm of Thermal Batting/Wadding
  • 30 cm of Cotton-Soft (or light-weight) Batting/Wadding
    • (The fabric I used was 150cm (60 Inch) Wide. I managed to get the required pieces cut out with a small amount left over. If you’re using fabric with a shorter width, I would double the amount so you’d need 60 cm.)
  • 50 cm Coordinating Bias Binding (You could also make your own with the same material if you prefer)
  • Fabric Marker Pen/Tailors Chalk (I used a Sewline Marker Pen)
  • Coordinating Thread(s)
  • Scissors
  • Walking Foot (for Sewing Machine)
  • Quilting Needles (for Sewing Machines Size 90)
  • Sewing Machine
  • Pins
  • Sellotape
  • Printer – to Print out your pattern pieces

How to Make a Heart-Shaped Oven Mitt

You’ll need to download the Heart Shaped Oven Mitt pattern, this will be used for your pattern pieces. You will need to print the file as it is, do not “Fit-to-page” or adjust the sizing or your mitt will be too small. You’ll need to print two copies of each pattern piece.

When printed, cut around the solid lines of each pattern piece. For Pattern piece ONE, you will need to join both piece so that the arrows are joined in the middle – for this to work you’ll need to flip one piece over. Once level sellotape together.

Pin all three pattern pieces to your material and cut out. You’ll need to make sure that you’re cutting out two of each piece. So you’ll have 2 full heart shapes (pattern piece one) and 4 half-heart shapes (pattern piece two.)

​Trim the pattern pieces to the dotted line, so they will now be smaller. Pin the full-heart shape (pattern piece one) to the thermal wadding/batting and cut. Pin the half-heart shapes (pattern piece two) to the cotton-soft batting/wadding and cut out. You should have one cut of pattern piece one and two of pattern piece two.

Using a ruler and your chosen fabric marker men (or tailor’s chalk) mark diagonal lines across the thermal wadding, each 2.5 cm apart from the last. Repeat this in the opposite direction to create a cross-hatched pattern.

Place the thermal wadding, cross-hatched side up in the middle of one of the main fabric full-hearts. You’ll want to make sure your bottom fabric is facing wrong side up.

Set up your sewing machine with the coordinating thread and your walking foot.

​Stitch along the first of the lines you have marked. Trim your thread at the end. Line up the sewing gauge with the line you have just sew and your foot with the next marked out line, stitch keeping the guide in line with the previous stitching. Repeat this until you have sewn each line in both directions.

Take two of the fabric half-hearts and the two pieces of cotton-soft wadding/batting. Line up the non-curved edge of the wadding with the non-curved edge of the fabric. You should have a small seam allowance (just fabric) around the curved edge.

Place the second half-heart fabric pieces on the top, so you now have a fabric-wadding-fabric sandwich. Pin lightly. Stitch in the same way you did the back of the mitt. So that you end up with two quilted half-hearts.

​Using a coordinating bias binding (or one you have made yourself) and coordinating thread, stitch the bias binding along the non-curved edge of the heart, repeat this for both hearts. You should have about 10 cm of binding left over.

Using the remaining bias binding, fold in half, press and stitch close to the edge. This will become your hook to hang the mitt with.

Using the remaining main fabric full heart, line the pockets up on top of the heart. You might find that the bound edges overlap at the ‘V’ in the top of the heart, but that is OK.

​Fold the hook in half and pin to the bottom edge of either pocket. Pin all the way around the pockets, pinning them to the main fabric heart.

Stitch from one pocket edge (where the binding starts) all the way around the heart, stopping when you reach the bias binding again at the other pocket. You’ll want to stitch as close to the edge as you can. I used a ¼ inch seam.

Place what you have just sewn, pocket side upwards on your work surface. Layer the thermal wadded piece on the top, so that the wadding is facing upwards. You should have right-sides of your fabric facing each other.


Stitch around the whole heart shape, leaving a 4 inch gap along one of the edges – this will be where you turn out your work. Stitch using a 3/8 inch seam allowance.

Clip the curved edges. Turn out your piece of work.

Press and hand-stitch the gap. Your oven mitt is completed – hooray! 🙂

To make our Heart Shaped Oven mitt we used our Country-look Linen Fabric, our poly-cotton bias binding and our heat-proof (Thermal) Wadding.

We hope you enjoyed this little tutorial and (as always :-)) we’d love to see any that you have made too, so feel free to send those to us via social media or our email address karendelahunty@outlook.co.uk

Happy Crafting and Weekend-ing!